
How to manage company equipment, step by step
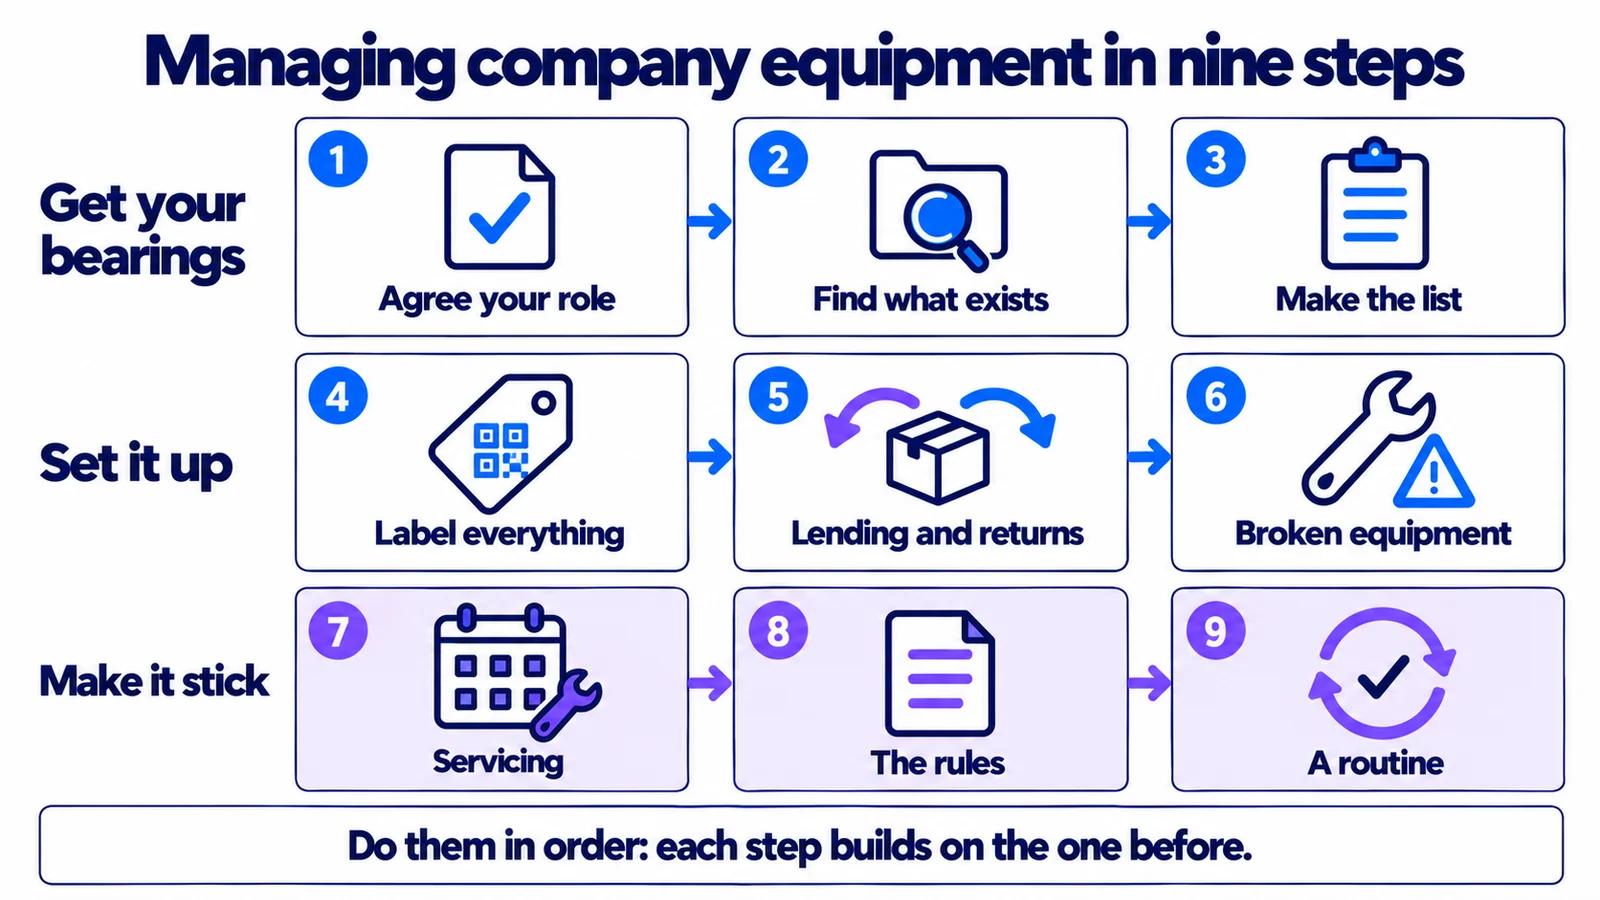
Just been made responsible for the equipment at work, on top of your actual job? This guide covers what the job includes, what to do first, and every step after that, in the order that works. Each step ends with a clear sign that it's done, so you can come back and pick up where you left off.
The short version
- Start by agreeing with your manager what you're responsible for and what you're allowed to decide. Most of the frustration in this job comes from skipping that.
- Make the list before you make rules. "Sign it out before you take it" only works once every item has a number.
- Every item needs a unique number, a label and a home it goes back to.
- Personal, shared and fixed equipment need different rules. Treating them alike is where most of the mess comes from.
- A spreadsheet is fine to start with. Change tools when you can name what the spreadsheet is failing at.
In this article
- What the job covers
- Part 1: Get your bearings
- Part 2: Set it up
- Part 3: Make it stick
- What you can leave for later
- Spreadsheet or software?
- Checklist: all nine steps
Somebody has asked you to keep track of the equipment. Maybe things kept going missing, maybe the insurer asked for a list, or maybe the person who used to do it has left. Either way it's your job now, usually on top of the one you already had.
This guide takes you through it in nine steps, in the order that works. Each step says what to do, how you know it's done, and where to find a template or more detail. You don't need to buy anything to follow it. Work through it at your own pace and come back to it as you go.
What the job covers
Whatever kind of equipment it is (laptops, power tools, cameras, lab instruments or vehicles), the job comes down to five questions about every item:
| Question | What it means in practice | What goes wrong without it |
|---|---|---|
| Do we have it? | Every item is on one list, with its own number | Things get bought twice, or never replaced because nobody knew they were gone |
| Where is it? | Every item has a home, and you know if it's somewhere else | People spend time searching, or give up and borrow or buy |
| Who has it? | One named person at any time | Nobody is responsible when something goes missing |
| Does it work? | Faults get reported, fixed and recorded | Broken equipment gets handed to the next person |
| What does it cost? | Purchase price, repairs and how much it's used | Replacement decisions are guesses |
You don't need to solve all five at once. The steps below take them in the order that makes each one easier. For the definition and how it differs from asset management, see what equipment management is.
Part 1: Get your bearings
Roughly the first week. Nothing here needs a template, and none of it is wasted: steps 1 and 2 decide how much work the rest will be.
1. Agree what you're responsible for
"Keep track of the equipment" can mean anything from updating a list to approving every purchase. Find out which before you start, or you'll be blamed for things you were never asked to do.
Do this. Take these questions to your manager:
- Which equipment counts? Set a value floor (the lowest purchase price that puts something on the list), plus anything that's shared or easy to lose, whatever it cost. Then ask about the edge cases: are laptops and phones yours or IT's? Vehicles? Keys? Consumables like batteries and printer ink?
- Which parts of the job are yours? Keeping the list, lending and bookings, getting things repaired, servicing and inspections, buying replacements, getting rid of old equipment.
- What can you decide on your own? Saying no to a loan, chasing someone who hasn't returned something, taking broken equipment out of use, and what happens when something is lost or damaged.
- Is there a budget, and who approves spending?
- What do you report, to whom, and how often?
- How much of your week is this supposed to take?
Write the answers down in half a page and get a yes on it. If there's ever a disagreement later, that page is what you point to.
Done when: your manager has agreed, in writing, what's in scope, what you decide and what you report.
2. Find out what already exists
You're rarely starting from nothing. There's usually a half-finished spreadsheet, and a colleague who knows where most things are. Collect all of it before you start counting, so you don't redo work that's already been done.
Do this. Look for:
- old spreadsheets and lists (there are often several, in different people's folders)
- the fixed asset register in accounting, which lists what was bought, but rarely where it is now
- the insurance list of covered equipment
- purchase invoices and order confirmations
- warranty papers and manuals, often in a drawer near the equipment
- IT's list of computers and phones
- a whiteboard or paper sign-out sheet
- the people who "just know", and what each of them knows about
Put copies in one folder. Don't try to merge or fix anything yet.
Done when: you know every place equipment is recorded today, and who to ask about what.
More detail: what your insurer will ask for after a theft, which is worth reading now, because the list you're about to make is the one they'll want.
Part 2: Set it up
Roughly weeks two to four. This is where most of the work is.
3. Make the list
The list is the foundation for everything after it. Rules about signing things out, booking or servicing only work once every item has a row and a number.
Do this.
- Walk every room, storeroom, vehicle and site. For each thing you see, ask: if this disappeared tonight, would we have to replace it? If yes, and it's above your value floor or shared, it goes on the list.
- Give every item its own row and its own number, including identical ones. Six identical microphones get six numbers, because "mic 3 crackles" is something you can act on and "one of the mics crackles" isn't.
- Use these columns: ID, name and model, category, home location, responsible person, purchase date and price, and status (in use, in storage, in repair, retired).
- Add these if you can: serial number, condition, warranty end date, service interval and a photo. They're what make the list useful for insurance claims, warranty repairs and servicing.
- Keep consumables separate. Batteries, tape and cable ties are counted, not tracked one by one.
Blank cells are fine at this stage. Missing items are not. You can fill in a purchase price later. An item that isn't on the list doesn't exist as far as anyone else is concerned.
Done when: everything you'd have to replace if it disappeared tonight has a row and a unique number.
Templates: the free equipment tracking spreadsheet, which works in the browser with no signup, or the asset register template for Excel.
More detail: creating an equipment inventory, step by step, and keeping consumables stocked.
4. Number it, label it, give it a home
The label connects the physical item to its row on the list. Anyone holding the item can find its record, and anyone reading the list can find the item.
Do this.
- Choose a numbering scheme and stick to it. A number identifies the item, not where it is or who uses it, because both of those change. Never reuse a number, even after something is thrown away. Pad the digits (
AV-007, notAV-7) so lists sort correctly. - Print labels. A QR code with the number printed underneath is enough for almost everyone. You don't need RFID or GPS trackers to start.
- Pick label material that survives. Paper labels peel off. Polyester or laminated labels last indoors; equipment used outdoors needs something tougher.
- Give every item a home: the shelf, cabinet, room or vehicle where it lives when nobody is using it. Write it in the list. Then "put it back" means something, and "it's not where it should be" becomes useful information instead of a shrug.
Done when: every item has a label, and anyone could put it back where it belongs.
More detail: numbering, label materials and where to put the label, QR, barcode, RFID or NFC, and how to print QR labels from a spreadsheet on DYMO or Brother label printers.
5. Decide how things are borrowed and returned
Not all equipment moves the same way, and one rule for everything will fit nothing. Sort what you have into three kinds first:
| Kind | Examples | What you need to know |
|---|---|---|
| Personal | A laptop, a phone, a set of keys | Who has it. What matters is the day they get it and the day they leave |
| Shared | A camera, a van, a projector, a drill | Who has it now, when it's due back, and who needs it next |
| Fixed | A printer, a compressor, a lab instrument | Whether it works. It doesn't move, so there's nothing to lend |
Do this.
- Personal equipment: record what each person receives, and have them sign for it. When they leave, the same list comes back.
- Shared equipment: every loan gets a name, a date out and a date it's due back. Note the condition when it comes back. A sign-out sheet next to the shelf is enough to start.
- When people need the same things at the same time: add bookings, so people can reserve equipment in advance instead of finding the shelf empty.
- New starters and leavers: agree with HR or whoever handles them that you're told, so equipment is handed out on day one and collected on the last day.
Done when: you can answer "who has it, and when is it back?" for any item in under a minute.
Templates: the equipment sign-out sheet.
More detail: four ways to track who has what, handing out and collecting equipment from employees, booking vs. checkout, and how to stop double-booking.
6. Make broken equipment easy to report
Most faults are noticed by the person using the equipment, not by you. If reporting takes effort, they'll put it back on the shelf and say nothing, and the next person gets it.
Do this.
- One place to report. A form, a shared inbox or a sheet. Not "tell whoever's around".
- A report needs three things: the item's number, what's wrong, and who noticed.
- Take it out of use straight away. A tag that says "broken, do not use", a separate shelf, or a status on the list. Equipment that's been reported broken and then lent out again is the most expensive kind of fault.
- Someone owns every report until the item is fixed or written off.
- Tell the person who reported it what happened. People keep reporting when they can see it leads somewhere.
Done when: broken equipment can't be lent out by mistake, and every report has a status.
More detail: a report-it-broken flow for shared equipment.
Part 3: Make it stick
Roughly the second month, and then ongoing. Steps 7 to 9 are what keep the list true after you've built it.
7. Put servicing on a schedule
Not everything needs servicing. The items that do tend to need it at fixed intervals, and an interval that only lives in somebody's head gets missed.
Do this.
- Pick out the items that need it: anything with a service interval from the manufacturer, anything that legally needs inspecting (what applies depends on your country and industry, for example lifting equipment or electrical testing), safety equipment, and anything that's expensive when it fails.
- For each one, note the interval, the next due date and who does it.
- Log every service and repair against the item's number: the date, what was done, by whom and what it cost. That history is what tells you when repairing stops being worth it.
- Don't lend out equipment on the day it's due for service. Check the schedule before you hand things out.
Done when: everything that needs servicing has a next date and a named person.
Templates: the preventive maintenance schedule and the equipment maintenance log.
8. Write the rules down and tell people
By now you've made most of the decisions. Write them down in one place, short enough that people actually read them.
Do this.
- Four short procedures on one page:
- Taking something: how you sign it out or book it.
- Bringing it back: where it goes, and what to say if it's damaged.
- Something's broken: where to report it, and to take it out of use.
- Joining and leaving: what you're given on day one, and what you hand back on the last day.
- Add where the list lives and who to ask. That's you.
- Tell people once, at a team meeting or in a short message, and put the page where the equipment is.
- Make the rule the easy option. The sign-out sheet hangs by the shelf, labels are easy to scan, and returning something takes less effort than keeping it.
- When something is overdue, ask about the item, not the person. "Is the projector still with you?" gets an answer. "You didn't return the projector" gets an excuse.
Done when: the rules fit on one page, and everyone who uses the equipment has seen them.
More detail: five ways small teams lose track of equipment, and the four procedures every business needs.
9. Set a monthly and yearly routine
The list starts going wrong the day after you finish it. A short, regular check keeps it right without becoming a second job.
Do this every month:
- Follow up on overdue loans.
- Check open repair reports. Is anything stuck?
- Look at servicing due next month.
- Make sure new purchases are on the list and labeled.
- Find a home for anything that doesn't have one.
Do this every year:
- Do a full count against the list, and write off what's gone.
- Decide what to retire or replace, and put a number on it for next year's budget.
- Check that the insurance list matches what you actually own.
Report this to your manager, at whatever interval you agreed in step 1:
- what you own and roughly what it's worth
- what has gone missing or been written off
- what's broken and how long it's been out of use
- what needs replacing soon, and roughly what it will cost
- what gets used a lot, and what hardly gets used at all
Done when: the monthly check is in your calendar and the yearly count has a date.
More detail: how to audit your equipment in a weekend, why equipment goes missing and how to stop it, and asset management reports.
What you can leave for later
Plenty of advice online will tell you to do much more than this. You don't need to, at least not yet:
- Depreciation. Accounting calculates that from their own records. Your job is to give them correct purchase dates and prices.
- RFID tags and GPS trackers. They solve specific problems, like reading many items at once or tracking vehicles. A printed QR label solves most of the rest. See which label technology you actually need.
- A maintenance management system (CMMS). These are built for maintenance departments that handle work orders. If your job is mostly keeping track of who has what, it's probably more than you need. See what a CMMS is.
- History for old equipment. Start recording from today. Don't spend weeks reconstructing who had what in the past.
Spreadsheet or software?
Start with a spreadsheet. It works well with a modest amount of equipment in one place, kept by one person at a desk. It stops working at fairly predictable points:
- A second person needs to update it, and you end up with two versions that are both partly wrong.
- The people using the equipment aren't at a desk, so the list gets updated hours later, from memory, or not at all.
- Things need booking in advance. A spreadsheet can show a clash, but it can't prevent one.
- You need reminders. Due dates and service dates pass without anyone noticing.
- You need history, like who had something when it broke. A spreadsheet only shows the present.
If none of those apply, stay with the spreadsheet. When one starts to, you'll know exactly what you need a system to do, which makes choosing one much easier. To compare options, see what 2,151 forum comments actually recommend and what's actually free. When you move, this is how to bring your spreadsheet with you.
Where Itefy fits
We make Itefy, an equipment management system for teams that share equipment. It covers steps 3 to 9 of this guide in one place: the list, QR labels you print yourself and scan with any phone, checkouts and returns with due dates, bookings that refuse a clash, fault reports, and servicing schedules with reminders. Equipment marked as not working is kept out of checkouts and bookings, and every item keeps its full history. You can import your spreadsheet, so step 3 isn't wasted. Plans start at $15 a month, billed yearly, and the trial is 14 days with no card.
Steps 1 and 2 are yours either way. No software can decide what you're responsible for.
Checklist: all nine steps
Come back to this as you go. A step is finished when its "done when" is true.
| Step | Done when |
|---|---|
| 1. Agree what you're responsible for | Your manager has agreed, in writing, what's in scope, what you decide and what you report |
| 2. Find out what already exists | You know every place equipment is recorded today, and who to ask about what |
| 3. Make the list | Everything you'd have to replace if it disappeared tonight has a row and a unique number |
| 4. Number it, label it, give it a home | Every item has a label, and anyone could put it back where it belongs |
| 5. Decide how things are borrowed and returned | You can answer "who has it, and when is it back?" for any item in under a minute |
| 6. Make broken equipment easy to report | Broken equipment can't be lent out by mistake, and every report has a status |
| 7. Put servicing on a schedule | Everything that needs servicing has a next date and a named person |
| 8. Write the rules down and tell people | The rules fit on one page, and everyone who uses the equipment has seen them |
| 9. Set a monthly and yearly routine | The monthly check is in your calendar and the yearly count has a date |
Frequently Asked Questions
-
Keeping track of five things for every item: that it exists on your list, where it is, who has it, whether it works, and what it costs to keep. In practice that means a list with a unique number for each item, labels, a simple way to borrow and return things, a way to report and fix what breaks, a servicing schedule for the items that need one, and a short monthly check.
-
With a conversation, not a spreadsheet. Agree with your manager which equipment counts, which parts of the job are yours, what you're allowed to decide and what you report. Then collect whatever records already exist before you start counting.
-
For most small teams, the first month or two alongside a normal job. Making the list is the slow part. Most of what comes after it is writing down decisions. Once it's running, it's a short monthly check and a full count once a year.
-
Not to start. A spreadsheet works with a modest amount of equipment, in one place, kept by one person. It stops working when several people need to update it, when people use the equipment away from a desk, when things need booking in advance, or when you need reminders and history.
-
At minimum: a unique ID, name and model, category, home location, responsible person, purchase date and price, and status. Worth adding from the start: serial number, condition, warranty end date, service interval and a photo.
-
Give every loan a return date, make signing out quicker than not signing out, and follow up on the item rather than the person. A due date that nobody checks teaches people that due dates don't matter, so look at overdue items every week.
-
They overlap. Asset management is usually financial: value, depreciation and what's on the books. Equipment management is practical: where an item is, who has it, whether it works and how much it gets used.